Earn While at Home

Wednesday, June 30, 2010

Squid in Oyster Sauce

It was been a while since I have posted my last blog, I apologize to my followers and visitors who frequently visity my site.  I have to attend to some personal errands.  Hopefully, I will continue as daily as possible.
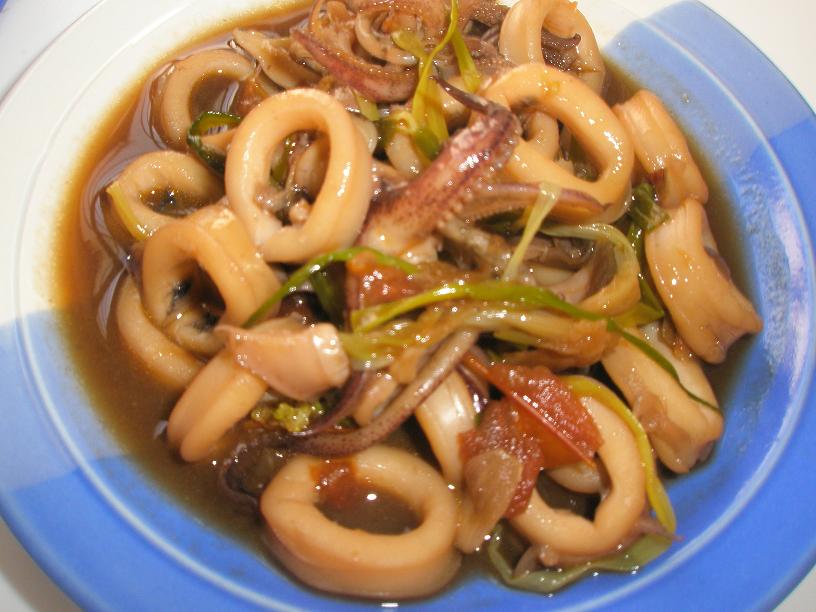
This is a Chinese dish that is cooked in Filipino style and taste.  Very easy to prepare and cook.  I don't wonder why chinese restaurants serve their food fast.  
 I would like to give credit to my friend-Rose who unselfishly taught me this recipe.  I appreciate it very much and proud to share your recipe with the rest.

Ingredients:
500 g. squid cleaned, sliced
spring onion
1 small onion sliced
3 cloves garlic crushed
1 tomato sliced
1 tbsp. soy sauce
3 tbsp. oyster sauce
2 tbsp. sugar


Procedure:
1.  In a wok, saute garlic and onion until limp.  Add tomato and continue to saute for a minute.
2.  Add squid and saute for another 2 minutes.  Put soy sauce and oyster sauce, mix well with squid.
3.  Add sugar and mix for another minute.


Tip:
Don't overcook the squid. 
 

Tuesday, June 1, 2010

Crispy Spare Ribs

 
Easy way of cooking tasty spare ribs. You would love the smell while frying and crunch while eating.


Ingredients
1 kg Pork spare ribs 2 inches cubed
1/2 cup vinegar
1/3 cup water
1 tsp. iodized salt
1/3 tsp. ground pepper
6 cloves garlic crushed
1/2 cup cooking oil

 
Procedure
  1. In a deep pan, combine garlic, iodized salt and ground pepper.
  2. Pour in vinegar and water.
  3. Add pork spare ribs and put into boil for 5 minutes or until pork is tender.
  4. Set aside for at least 3 hours before frying.

Frying: Heat oil in a pan, fry spare ribs until golden brown.

Thursday, May 20, 2010

Ginisang Sayote (Saute Chayote)

There was a time I bought vegetables for my chopsuey recipe. There were carrots, cabbage, red bell pepper, young corn, cauli flower, string beans, black fungus and sayote. When I prepare all the vegetables, I decided not to include sayote anymore since there were lots of cut vegetables more than enough to make a chopsuey. Hence, I save the sayote for future recipe. After 3 days, I decided to cook a much known Filipino vegetable dish that comes with meat and tomato. There are variations in cooking this dish; some uses shrimps, beef or even chicken. What is important is that, everyone enjoys eating this authentic vegetable Filipino dish in whatever ingredients it comes with.


Ingredients:
250 grams ground pork
1 sayote (julienne)
1 tomato (sliced)
2 cloves garlic (crushed)
1 small onion (chopped)
½ tsp. Ground pepper
1 tbsp. Fish sauce
1 cup water
1 Maggi pork cube

Procedure:

  1. Wash ground pork in water, strain to remove excess water.
  2. In a wok, sauté garlic and onion for 2 minutes then add tomato then sauté for another minute.
  3. Add ground pork; mix well until pork brings out its own water. Cover for 5 minutes until water evaporates and tender.
  4. Add ground pepper, fish sauce and sayote. Mix for another minute then add 1 cup water. Bring to boil. Add pork cube combine with the vegetable mix and simmer for another minute.

Fried Calamari

“Calamari” is a plural form of Italian word for squid. In food term, it is commonly known to be a batter-coated deep fried squid which is customarily serve as an appetizer. “The Cook” prepares Mayo-garlic dip which compliments the taste of the calamari.


Ingredients:
500 grams white big squid (cut in ½ inch thick)

 
Batter:
1 cup all purpose Flour
1/3 tsp. Baking powder
1 tsp. Iodized salt
½ tsp. Ground pepper
Cooking oil

Dip:
2 cloves garlic crushed
Mayonnaise

 
Procedure:

 
  1. Wash squid and drain to remove water. Set aside.
  2. In a plate, combine flour, baking powder, iodized salt and ground pepper. Mix well.
  3. Dredge each cut squid in the flour mixture until fully covered.
  4. Heat oil in a deep pan, fry squid for 1 minute.

 
Dip:
Mix mayonnaise with garlic.

 
Tips:

 
  • Small amount of baking powder can make your calamari crispier.
  • Do not over fry the squid. Over frying will make the squid tough.


Wednesday, May 12, 2010

Veggie Meatballs

A different fusion of vegetable and meat in a simple meatball preparation. Also, if you have some vegetables in your fridge and can’t think of what to cook, you may put them all together and add your favourite ground meat to make nutritious meatballs. Kids will surely love this!


Ingredients:
 
1 kg. Ground pork or ground beef
1 carrot shredded
10 pcs. String beans (finely chopped)
1 small onion (finely chopped)
½ tsp. ground pepper
1 tsp. iodized salt
All purpose flour
Cooking oil

 
Procedure:
  1. In a bowl, combine ground meat with carrots, string beans, onion, ground pepper and iodized salt. Mix well.
  2. Using a teaspoon as a gauge, get the mixture, mold into palm and dredge in flour.
  3. Heat oil in a deep pan, fry molded meatballs.
  4. Serve with catsup or barbeque sauce.


Monday, May 10, 2010

Pork Teriyaki

You can make your own Teriyaki sauce and can store it in a bottle, fridge it and use it whenever you want to marinade on meat, chicken or fish. Cooking is fast, it saves you time and effort. Best served as a rice topping.


Ingredients:
 
500 grams pork tenderloin (cut in strips)
1 tsp. Sesame seed
Spring onion (chopped)
Cooking oil (preferred canola oil)

 
Teriyaki sauce for marinade:
1 cup soy sauce
1 ½ cup white sugar
1 tbsp. sesame oil
1 tbsp. ginger (minced and crushed)
3 cloves garlic (crushed)

 
Procedure:

 
Marinade: mix all the ingredients in a sauce pan and bring to boil. Stir continuously until the sauce thickens. Marinade 1/3 cup over pork overnight.


Fry:
  1. Heat oil in frying pan; fry the pork to your desired doneness.
  2. Add more teriyaki sauce and mix with the pork.
  3. Remove from pan. Sprinkle spring onion and sesame seed over pork. Serve.


Sunday, May 9, 2010

Carino's Grill in Dubai, UAE

Carino’s Grill is an Italian casual dining that has a warm and relax ambiance. As one approaches the restaurant’s door, you can feel the inviting smile of the dining staff greeting each guest, their hospitality would make one feel special as they lead you to your chosen seat.

 After a few minutes, a freshly- baked herbed bread is served paired with garlic, olive oil and balsamic vinegar dip as a free starter (this is really good and you can’t resist eating this bread). There are a wide range of Italian food choices, that you can hardly pick from because everything looks pretty delicious.

The upbeat servers  wearing a smile on their faces, take your order and pleasantly answer each guest’s questions on the selected menu and even makes great suggestions along the way. So from my frequent dining Carino’s Grill experience, here are "The Cook’s" recommendations of the best dishes among the flavourful handcrafted meals of Carino’s:

Spicy Shrimp and Chicken AED 56 (Php 700.00)

Large succulent shrimps, sliced grilled chicken sun-dried tomatoes, green onions and freshly sliced mushroom tossed with penne pasta in cayenne pepper and romano cream sauce.

                          Grilled New York Strip AED 72 (Php 900.00)

A hearty 12 oz. USDA center cut strip steak perfectly seasoned and basted on open-flame grill. Served with garlic sautéed spinach and a side of pasta of your choice (best with fettuccini in creamy alfredo sauce). It is served with mushroom sauce or pepper sauce.

                Italian Chocolate Cake AED 28 (Php 350.00)

Generous slice of flavourful and rich chocolate cake topped with sweet chocolate icing and chocolate shaving, served warm with vanilla ice cream.


Therefore, when you travel to Dubai for leisure, business or work, Carino’s Grill is worth visiting for your Italian dining satisfaction. I can truly say that your money is worth spending for your dining pleasure.


Carino’s Grill Branches: Burjuman Center, Bur Dubai
                                     Dubai Festival Center
                                     Deira

Tuesday, May 4, 2010

Chicken Pastel

Chicken Pastel is dry bread stuffing. It is baked in a crust or poured over hollow bread when served. This time, The Cook’s Chicken Pastel is prepared with creamy sauce. You can top it on rice or serve with toasted bread or stuff it inside a pan de sal.


Ingredients:
1 kg. Whole chicken (cut in small sizes)
2 whole potatoes (squared)
1 red bell pepper (squared)
1 pack young corn (sliced ½ inch)
1 can Vienna sausage (drained and sliced)
1 slice quick melt cheese
½ lemon
1 small can button mushroom (sliced)
1 small onion (sliced)
3 cloves garlic (crushed)
1 cup water
¼ tsp. ground pepper
2 tbsp. fish sauce
1 tbsp. soy sauce
1 tsp. butter
1 small can evaporated milk
Cooking oil

 
Procedure:
  1. Marinate chicken with lemon for 30 minutes.
  2. Heat the pan with oil, fry the potatoes. Set aside.
  3. Add 1 tbsp. oil in the pan, sauté garlic and onion. Add the marinated chicken, ground pepper, fish sauce and soy sauce, stir with garlic and onion until chicken is half done. Add water then put to boil.
  4. Add potatoes, young corn, Vienna sausage, red bell pepper, butter and cheese. Boil for 3 minutes until potatoes and chicken are tender.
  5. Add evaporated milk cook for a few minutes until sauce is creamy.

Monday, May 3, 2010

Sweet & Sour Hammour (Lapu-Lapu/Grouper)

Admittedly, I used to cook with ready mixes specially sauces that I have no idea of cooking and one of these is the sweet and sour. Why? It is convenient to use, saves me time and effort in my food preparation and in just a snap of a finger, Alas! The food is ready to serve. But, as I read the package, it offered a lot of preservatives which made me think if continued usage will be good for me and my family’s health. It made me think twice, it is a matter of convenience over risking health. Until one day, a good friend of mine Vivian has taught me of a very easy way of cooking sweet and sour sauce. At first I thought that it is difficult to prepare but as I go and put my hands on it, I realized that it was not. I am so grateful to my friend for teaching me her recipe and now I am sharing this to everyone.


Ingredients:
2 medium size hammour fish (Lapu-Lapu/Grouper) scaled and cleaned
50 grams carrots (julienne)
½ green bell pepper (julienne)
1 tbsp. Ginger (thin slices)
1 small onion (sliced)
2 cloves garlic (crushed)
¼ cup tomato sauce
½ cup water
1 tbsp. vinegar
5 tbsp. sugar
½ tsp. corn starch mix in 1/3 cup water
Iodized salt
½ tsp. ground pepper (sauce)
½ tsp. ground pepper (fish)
Cooking oil

 
Procedure:

Frying:
 Rub in iodized salt and ground pepper to fish. Set aside for 30 minutes. Heat oil in frying pan, fry fish.

 
Sauce:
  1. Heat oil in a sauce pan, fry ginger until a little bit brown. Sauté garlic and onion with the ginger. Add carrots, bell pepper and ground pepper. Stir for a minute.
  2. Add water, vinegar, tomato sauce and sugar. Continue to stir until bubbly.
  3. Add corn starch, simmer for another minute.

 In a serving dish, top the sweet and sour sauce over fried fish.


 Tips:
  • Adjust the color of the sauce by putting more tomato sauce to meet your desired color. 
  • Taste the sauce from when cooking to check if you still have to adjust other ingredients.


Saturday, May 1, 2010

Lechon Kawali (Crispy Deep-Fried Pork)

Sharing how “The Cook” prepares and fry this all time favorite pork dish. There are a lot of ways on how this is being prepared but “The Cook” has a simple way of cooking it by which taste is not compromised. There will also less fear of frying this since it will not blow up when you started to fry the pork belly in boiling oil.


Ingredients:
1 kl. Pork belly (cut in 1 inch strips)
Iodized Salt
500 ml water
2 cups cooking oil (preferred corn oil or canola oil)

 
Procedure:

 
  1. Boil pork belly strips in water. When tender, remove and drain in a strainer.
  2. Sprinkle with iodized salt covering all sides of the pork.
  3. Put inside the freezer for 3 hours or until pork belly are frozen.
  4. In a deep pan, pour in the cooking oil and heat for 3 minutes. Put the frozen pork belly, sprinkle with water from time to time (you will notice blisters from the pork skin).
  5. Turn the pork belly strip to the other side to fry to your desired color, again, sprinkle water until blisters come up the skin. When it is cooked, remove excess oil with paper towel.
  6. Cut in your desired size.

 
Tips:

 
  • Freezing the pork belly after boiling will give you a less blast of oil while frying.
  • Sprinkling of water during frying will give you crunchier pork skin.


Friday, April 30, 2010

Chopsuey with Shrimp

“Chopsuey” is a stir fry vegetable mix in thick sauce. This cooking may sometimes comes with chicken, pork or beef. But my chopsuey recipe will be loved by vegetarians since this is meatless. This comes with a rich taste of shrimp with its base and perfected to a desired thickness. Chopsuey is originally a Chinese cuisine but Filipinos adopted the cooking and made it as its own in different cooking style and variations in ingredients used.


Ingredients:
250 grams shrimp (shelled, set aside shrimp head for soup base)
100 grams string beans (cut diagonally)
10 pcs. Young corn (sliced)
Quarter cabbage (sliced)
1 small carrot (sliced)
½ head cauliflower (trimmed)
1 small green bell pepper (squared)
¼ cup dried black fungus (taingang daga)
1 small onion (sliced)
3 cloves garlic (crushed)
¼ tsp. ground pepper
5 tbsp. soy sauce
1 cup water
1 tsp. corn starch
½ tsp. Magic Sarap (optional)
3 tbsp. olive oil

 
Procedure:
  1. Pound the shrimp head in mortar and pestle. Pour in water, stir and drain with strainer to get the shrimp soup base. Set aside (3/4 cup for shrimp base and ¼ cup for corn starch mixture).
  2. Soak the black fungus (taingang daga) in water. Set aside.
  3. In a wok, sauté garlic and onion. Add cauliflower, carrot, green bell pepper and young corn. Stir for a minute.
  4. Add the string beans and cabbage pour in the soy sauce and stir for another minute.
  5. Add the ground pepper and Magic Sarap, mix with the vegetables well.
  6. Pour in the shrimp base, shrimp and dried black fungus, let boil.
  7. Pour in the corn starch mixture. Stir and simmer for 2 minutes.

 
Tips:
  • Don’t forget to wash the vegetables in water before cooking.
  • Don’t overcook the vegetables.
  • For non vegetarians, you can use chicken, pork or beef.


Wednesday, April 28, 2010

Menudillo

It’s been a while since I wrote my last food blog. Unfortunately, I have to set aside my blog for a more important matter and that concerns family. But now, I am back and started to cook and write again.
Have you heard of Menudillo? This is a simplified “Menudo”, an old Filipino dish that is served during occasions such as Fiesta, small family get together and gatherings or simply viand for lunch or dinner served with white rice. Instead of using liempo or pork belly, I substituted ground pork and the rest of the ingredients are the same. This is just a simple recipe and anyone in a rush can cook this in 30 minutes.

Ingredients:
500 grams ground pork
1 pouch Tomato sauce 220 ml
¼ cup tomato catsup
1 dozen quail eggs
100 grams carrot (diced)
100 grams potatoes (diced)
50 grams red bell pepper (diced)
¼ cup dried raisins
4 cloves garlic (crushed)
1 small onion (finely chopped)
4 tbsp fish sauce
½ tsp. ground pepper
2 tbsp cooking oil (preferred canola oil)

Procedure:

  1. Wash the ground pork in running water, drain and set aside.
  2. In a sauce pan, boil the quail eggs. Remove from boiled water, set aside. Peel the shell when it gets cold.
  3. Heat oil in a deep pan, fry the potatoes until golden. Remove and set aside.
  4. In the same pan, sauté garlic and onion. Add the ground pork, fish sauce and ground pepper. Stir continuously for 5 minutes. Add the carrots, bell pepper, raisins and cook until its natural water evaporates and ground pork is light brown in color.
  5. Pour in the tomato sauce and tomato catsup. Stir more for 5 minutes.
  6. Add the fried potato and quail eggs.
Makes 5 servings.

Thursday, April 22, 2010

Milky Chicken Sopas

When I was still a child, my mother cooks this as an afternoon snack. I remembered that she adds chicken heart and slices of hotdog and she serves it hot! Oh I love to eat this during rainy days. I can eat 3 bowls of it until I get a full stomach.  
As I cook it now, I enhanced by putting milk and vegetables to make it healthier. It is cost friendly too so everyone can afford to buy and enjoy this nourishing snack.


Ingredients:

200 grams elbow macaroni
250 grams chicken breast
1 liter water
1 small can of evaporated milk
1 small onion (chopped)
4 cloves garlic (minced)
2 tbsp butter
100 gram carrot (diced)
Quarter of red bell pepper (diced)
1 cup cabbage (sliced)
1 stalk celery (sliced)
Celery leaves
4 tbsp fish sauce
¼ tsp. ground pepper
 
Procedure:

 
  1. Boil the chicken in 500 ml of water. Remove the chicken from the broth, cut the chicken in small pieces.
  2. Heat the pan; melt butter then sauté garlic and onion until onions are limp.
  3. Put the chicken pieces, sauté more with garlic and onion and put fish sauce, mix well.
  4. Pour in the chicken broth, put to boil.
  5. Put the elbow macaroni, stir continuously and cook until aldente.
  6. Put the carrots, evaporated milk, ground pepper and cabbage. Simmer for 3 minutes.

 
Makes 5-8 servings.


Wednesday, April 21, 2010

Oxtail Stew

What can you do to your oxtail aside from the all time favorite” Kare-Kare”? Most of the time, when I go to the market to buy oxtail it’s the Kare-Kare I thought of cooking. But as I explore, there are more dishes that I can do and one of these dishes is the Oxtail Stew. When it is done it will give you a thick sauce and when mix with herbs, it has a superb rich taste. So what are you waiting for? Go to the market and buy all the ingredients you need and start cooking your Oxtail Stew.


Ingredients:
1 kilo oxtail (cleaned and skinned)
1 liter water
¼ tsp. salt
1 tbsp. Butter
1 tbsp. Flour
2 tbsp. Cooking oil (The Cook preferred Canola oil) for potato and oxtail
1 tbsp. Cooking oil for sautéing onion
2 cloves garlic (minced)
¼ cup tomato sauce
2 tbsp. Fish sauce
1 laurel or bay leaf
½ tsp. dried parsley
½ tsp. dried rosemary leaves
1 potato (quartered)
1 medium size carrot (sliced)
1 celery stalk (slice)

 
Procedure:

 
  1. Boil the oxtail for 3 hours or until the meat is tender. Add more water if the water level is lower than your meat and the meat has not reached the desired tenderness. Skim off the brown color bubbles (meat blood). When it is tender, put the oxtail in a strainer to remove excess water. Set aside the oxtail broth.
  2. In a deep pan, heat the oil. Fry the potato until light brown. Remove and set aside. Put the oxtail back and brown each side for 5 minutes. Remove and set aside.
  3. In the same pan, add another tbsp. of oil then adjust to medium heat, sauté the onion and salt. When it is limp, add the butter and flour. Stir for about 2 minutes. As it thickens, add the garlic and stir well.
  4. Add the tomato sauce, continue to stir for another minute then put the oxtail back into the pan and add the fish sauce. Stir more.
  5. Reduce to low heat; add the oxtail broth, dried rosemary leaves, bay leaf, carrots and celery. Simmer until the carrots are cooked. Then finally, add the dried parsley and combine with the rest.
Serve with steamed rice. Makes 3-5 servings.


Tips:
  • Add more water (1 cup) if the mixture gets dry.


Tuesday, April 20, 2010

Salami and Pineapple Pan Pizza

As a mother, I would like to be innovative in preparing my children’s snacks. One should be creative in making different meals that your children would entice themselves in eating. It is because they can easily get fed up of the food that is served repeatedly. Most of the time, kids were very picky they love to eat colorful and salty foods over the nutritious snacks we offered and that’s where the trouble get started, being hooked on unhealthy snacking or the so called “junk foods”.  
So with a little invention on the main stay tasty bread in our dining table, I created a “homemade” pizza. Heating the pizza is not a problem if you don’t have an oven, a non-stick pan fryer will do. Literally, it is “pan pizza” because you just need a pan to heat your pizza (“,). Here it is....


Ingredients:

Tasty bread/milk bread/pan de sal
Pizza sauce
Mozzarella and cheddar cheese
Salami
Pineapple tidbits

 
Procedure:
  1. Fry the salami in its natural oil. Do not overcook. Set aside. 
  2. Spread the pizza sauce on the bread.  
  3. Sprinkle on the mozzarella and cheddar cheese on top. 
  4. Put the salami and pineapple. 
  5. Heat the non-stick pan (low heat only); put the pizza bread for a minute. Turn the pizza on the other side, melting the mozzarella and cheddar. If the cheese doesn’t stick to the pan anymore, get the pizza with a spatula.

 Serve immediately.


Tips:   
  • You can add more toppings like mushrooms, ham, bacon, green bell pepper etc.


Sunday, April 18, 2010

Beef Salpicao

Spain has influenced the Philippine culture since the latter was been colonized for about 300 years. Under the Spanish era, there was introduction of Christianity amongst the people, culture was greatly embraced such as the language, celebrations and festivities are somehow the same like doing the “ Fiesta”-celebrating the feast of Saint in a particular church, lent observation by staging the life of Jesus through “Cenaculo”, lively entertainment through singing and dancing and one of the popular and favorite folk dance is the"Carinosa”, resting or taking the “siesta”, and a lot more ways which until now were being enjoyed and celebrated. With this adoption on our culture, the manner of cooking and its preparation were passed on too. Most popular foods were Afritada, Paella and Tinola. Since there were merged in cultures, Filipinos love Spanish cooking and eating as well.
Today’s recipe is Beef Salpicao, one of modern Spanish cooking but I put a slight alteration on ingredients that goes well with the Filipino taste. No difficulty in cooking since preparation is very easy and cooking time will just give you 15-30 minutes. With this cooking, let us taste the fusion of the two cultures in your kitchen.

 
Ingredients:

 
500 grams beef tenderloin (1 inch cube)
5 tbsp. Worcestershire sauce
5 tbsp. Seasoning
6 cloves garlic (crushed)
4 cloves garlic (thinly sliced)
4 tbsp. Olive oil
Butter (as mush as you like)

 
Procedure:

 
Marinade: In a bowl, combine beef with crushed garlic, Worcestershire sauce and seasoning. Marinate for at least 3 hours.

 
Flying:
  1. Heat olive oil in a pan. Fry garlic slices until light brown. Set aside.
  2. In the same pan, sear the beef tenderloin until well browned. Once the beef is cooked, add the butter until it is melted over the beef, stir for 1 minute.

In a serving plate, top the fried sliced garlic over the beef and serve with steamed rice. Serves 3-4 pax.


Tips:
  • Marinade beef overnight. The beef will absorb the marinade more than just leaving it for 2-3 hours.
  • Do not let the garlic slices burn.


Saturday, April 17, 2010

Paksiw na Galunggong con Prito

Last Tuesday April 13, in one of my high school friend’s wall post, a trail of discussion regarding “Monggo” (a Filipino vegetable dish of monggo beans with bitterguard leaves and a little bit of soup). I together with my high school friends discussed freely another dish that would match this soup. So along the trail of comments, we have talked about fish-Galunggong (Mackerel Scads) in particular. I have triggered the discussion commenting that aside from the usual fried Galunggong, there is another way of cooking it better, by marinating with vinegar or popularly known to be “Paksiw” prior to frying the fish. This is an all time favorite meal by our old folks and usually comes with “Monggo soup”. So, one of them requested me to blog this (though it is quite common) since there are still some who does not know how to cook this very simple dish. Granting my friends’ request, I am now writing about it and hope that I can extend it to all who wants to give it a try.

Ingredients:
1 kilo Galunggong (Mackerel scad) cleaned
½ cup vinegar
¼ cup water
1 head garlic crushed
1 tbsp. Iodized salt
1 tsp. ground pepper
Cooking oil

Procedure:
  1. In a bowl, combine crushed garlic with ground pepper.
  2. Pour in vinegar and water. Stir.
  3. Arrange the Galunggong in a pan and pour the vinegar mix. Bring to boil for 5 minutes. Set aside. Let stand for at least 3 hours before frying.
Frying: Heat the cooking oil in a pan; fry the Galunggong fish until crispy.

Serve with steamed rice.

Tips:
  • Do not over boil the fish. 
  • Soak the fish to its marinade overnight to absorb the vinegar mixture before frying.

Thursday, April 15, 2010

Tofu Steak

Eating Japanese foods is one of my dining out food trips. Commonly ordered are Shrimp tempura (enjoyed by kids), California maki, chicken teriyaki, sushi and yakisoba! The art of eating Japanese food starts when you pick up those slim sticks, fix in your fingers and figure out how will you pick up the yummy food with those sticks? Well, well...that is your problem but not me! I know how to use “Hashi” or the chopsticks (“,) and I am fast and good with that!


So much for my long Japanese food introduction. Anyways, the recipe that I want to feature today is Tofu Steak. I have come to know this meal when the waiter recommended it. Something new apart from what I usually order in a Japanese restaurant, I tried this on. When it arrived in my table, I pick up my Hashi, get a square of tofu steak and tasted ....it is great! The taste of the ground pork mixture blends well with the fried tofu underneath. I scrutinized the ingredients well so that I can experiment cooking the same at home. Now, I am glad that I made my own version and excited to share The Cook’s Tofu Steak!

 
Ingredients:

 
Tofu (slice in ¼ inches thick)
500 grams ground pork (wash in water and drain)
100 grams button mushroom (sliced)
Quarter size red bell pepper (diced)
1 tbsp. Spring onion (slice in small pieces)
1 small onion
¼ tsp. ground pepper
3 cloves garlic (crushed)
1 cup water
1 tbsp. Corn starch
4 tbsp. Soy sauce
3 tbsp. Oyster sauce
1 tsp. Worcestershire sauce
3 tbsp. Sugar
2 tbsp. Cooking oil
Flour
Iodized salt

 
Procedure:

  1. Sprinkle iodized salt in all sides of tofu. Set aside.
  2. Mix water and cornstarch well. Set aside.
  3. Heat the cooking oil in a wok. Sauté the onion and garlic until the onion is limp. Put the ground pork, sauté with onion, garlic and bell pepper and ground pepper. Cover for 10 minutes or until water evaporates.
  4. Add the cornstarch mixture, soy sauce, oyster sauce, sugar and Worcestershire sauce. Mix well.
  5. Put the mushrooms and spring onion. Cook for another 3 minutes.

 
Frying Tofu:

 
  1. Dredge all tofu in flour.
  2. Heat cooking oil in pan,  fry tofu to your desired color.
  3. Drain in paper towel.

 In a serving plate, top the ground pork to fried tofu. Serves 5-6 pax.


Wednesday, April 14, 2010

Tuna and Cheese Omelette

Sharing my husband’s recipe, though he is not really cooking, somehow he knew the basics. Allow me to tell the story behind this recipe. I remembered one weekend my husband woke up ahead of me and the kids. To my surprise, I found him in the kitchen cooking! I saw a can of tuna, 8 egg shells, a frying pan and spatula, bottles of iodized salt and cooking oil. As I approached him, he greeted me with a smile on his face and I asked him what he is up to. So he gladly told me that he will do the breakfast for us and I just have to sit down and relax, but curiously I stand beside him as I watch him do his craft. It just took him a few minutes to cook and soon we feasted over his tasty and sumptuous tuna and cheese omelette! Isn’t it nice to be surprised by your husband’s cooking?

Ingredients:

1 canned tuna flakes (preferably Guisado flavor)
4 eggs
Pinch of iodized salt
2 tbsp. Cooking oil
2 slices processed cheddar cheese

Procedure:
  1. Beat the 4 eggs, put iodized salt and set aside.
  2. Heat the skillet. Put the tuna flakes together with its oil, stir and let boil for 3 minutes or until a little oil is left. Remove and set aside.
  3. In the same skillet, put the cooking oil heat for a few seconds. Pour in half of the beaten eggs covering the entire skillet. Spread half of the cooked tuna flakes and top with cheese. Fold and turn the omelette to cook the other side. Remove from skillet and do the same procedure for the 2nd half.
Serve with toasted bread or steamed rice.  Makes 2-3 servings.


Tuesday, April 13, 2010

Pork and Broccoli Stir Fry

This is my version of pork and broccoli stir fry.  I added some ingredients and enhanced the taste that brings out the flavor of the pork and vegetables and a little sweetness to blend the taste.  For those who love  Asian dishes, try this out cause this is one of the bests.

Ingredients:

500 g. pork tenderloin
1 tbsp. crushed ginger
5 cloves crushed garlic
5 tbsp. soy sauce (divided)
5 tbsp. sugar (divided)
3 tbsp. oyster sauce
1 head fresh brocoli (trimmed)
1 onion chunked
1 carrot (cut in desired size)
1 cup water
2 tbsp. cooking oil
1 tbsp. olive oil
1 tsp. sesame oil

Procedure:
  1. Cut pork in strips. Wash, drain excess water and put in a bowl.
  2. Marinade: Combine the pork with garlic, ginger, 1 tbsp. soy sauce and 2 tbsp. sugar.  Let stand for 30 minutes until the pork absorbed the marinade.  While waiting for the marinade combine the remaining cornstarch and soy sauce with water, set aside. 
  3. Wash the brocoli and carrots, cut and slice in desired size.
  4. Heat 2 tbsp. cooking oil in wok (or in a deep pan) over high heat add the pork and stir fry for 3 minutes.  Remove from pan.  In the same wok, heat olive oil and add onion, brocolli and carrots.  Stir fry for 5 minutes or until vegetables are crisp.  Remove from pan.
  5. Bring back the pork in pan, add the soy sauce and cornstarch mixture, when sauce thickens, add the oyster sauce and the remaining sugar.  Stir for another minute.   Add sesame oil and stir for seconds.
Serves 5-6 pax.

Tips:
  • Don't overcook the vegetables.  Vegetables are best served when tender and crisp. 

Monday, April 12, 2010

"The Cook's" Delight

I am so happy! Honestly, at this point in time that I am typing this blog, I am really glad, my heart is filled with joy, so inspired! What made me say this???

Now is my 7th day as a food blog writer, who had a simple wish- that my recipes be known and tried on by my readers. A wish that will be helpful to those that I was once before (limited cooking hands on or no cooking knowledge at all). A passion of sharing the recipes I learned from cookbooks, recipes that were passed on to me by relatives and friends, or recipes that I simply experimented and somehow had a good taste. And with this wish, passion and intention, I was able to please my readers. One of them is a good friend who tried one of my recent recipes. She said “ Hey_____(The Cook)! Tried the Cream Dory in Lemon butter sauce for dinner tonight...my husband said "Ooohh lala :) “And my kids loved it! Keep it coming and please more fish recipes and salads :) yum yum great job with the blogs!” Isn’t it inspiring? When I saw her remarks from my Facebook I am truly flattered! It drives me to write and post more and more. And to you my friend, thank you so much. You made my day so enchanted that I made you and your family like the food. Promise to all of you that I will keep it coming!

Sunday, April 11, 2010

Cream Dory in Lemon Butter Sauce

Sharing what I cooked for my family today. This simple dish captured the taste buds of my husband and kids since they love the crunchy fish topped with fried garlic in exquisite lemony butter sauce. No special ingredients or spices needed, just what you usually have in your kitchen cabinet and stock of lemon, that’s it!

Ingredients:

500 g. Cream Dory fillet
1 lemon squeezed (1/2 for marinade, ½ for sauce)
1 head garlic (square in small pieces)
Iodized salt
Ground pepper
200 g. Flour
1/3 tsp. baking powder
50 g. Butter
Cooking Oil

Procedure:

Cream Dory Marinade
1. Clean Cream dory in water, drain water.
2. Squeeze in lemon covering all sides of the fillet then rubbed in iodized salt and ground pepper.
3. Set aside for 30 minutes.
4. Mix flour with baking powder; dredge the cream dory fillet until fully covered by flour.

Lemon Butter Sauce: Heat pan and  melt the butter in sauce and add lemon.

Frying:

1. Deep fry garlic in cooking oil until golden brown. Remove from pan and put in strainer to remove excess oil.
2. In the same frying pan, fry fish fillet in desired color. Drain in paper towel.

Top with fried garlic. Makes 3-4 servings.

Friday, April 9, 2010

Chicken Sandwich Spread

My parents have a small business snack house in our place.  It is been operating there for about 25 years already and one of the items that their patrons crave for is the chicken sandwich.   Years ago, I watched my mother how she prepares all the ingredients and make it in just a matter of minutes. 

Ingredients:

250 g. chicken breast
50 g. carrots
1 stalk celery
2 tbsp. pickle relish
3 tbsp. sugar
1 cup real mayonnaise
1/3 tsp. ground pepper

Procedure:

1.  Boil the chicken breast.
2.  Cut the chicken in desired size. 
3.  Cube the carrots and celery stalk in small pieces.
4.  Mix all the ingredients to the chicken.
5.  Serve in a bun or milk bread with lettuce, cheese and cucumber.


Serves 8 pax.

Thursday, April 8, 2010

My Little Chefs

It is my pride to write something about my kids, on what interest them, on what they learn or even on what they want to do.  I would like to treasure and cherish every single moment they accomplish as kids.  Here is one of the memories I want to share because aside from enjoying what they are doing, they too have a passion for cooking.

It was February 6, 2010,  we met a good friend of my husband in Dubai Mall and decided to treat her to Uno Grill (an American Restaurant known for their grills and pizzas).  As we started to choose our menu, my kids noticed that they can create their own pizza.   With a smile and excitement on their faces, we decided to order one for them.  Sooner, the pizza arrived so with the rest of the ingredients.  Chef's hats and aprons are also provided for them to make them really look like a real Chef!  I love seeing my kids enjoying what they do, and of course, the proud Mama took pictures in any possible angle while they are busy creating the pizza of their choice.   It is just sad that they can't really go to the restaurant's oven to finally cook the pizza they prepared. Are your children inclined to cooking?

Shrimp in Garlic Sweet Sauce

The Shrimp in Garlic Sweet Sauce will take you only 10 minutes to cook.  This is the fastest food that I ever served since I started cooking.  It has simple ingredients that are usually available in your kitchen so it will not take your time to buy rare ingredients from your nearest grocery store.  I recommend this recipe to all working moms with a very limited time to prepare and cook for their family, to all that have surprise guests and even to those people that would like to impress others with their smart cooking.

Ingredients:

½ kl. Shrimps (cleaned)
1 head medium size garlic (crushed)
1/3 tsp. ground pepper
5 tbsp. banana catsup
3 tbsp. sugar
2 tbsp. Butter

Procedure:

1. In a skillet, melt butter and sauté crushed garlic until light brown.
2. Put the shrimps, ground pepper and sauté for 2 minutes.
3. Put the banana catsup and sugar, sauté well. Simmer for 2 minutes.


Serves 5 pax.

Tips:
  •  Do not overcook the shrimp.
  • Adding more garlic will give more flavor to your dish. 
  • Adjust the measurement of other ingredients to your desired taste.


Wednesday, April 7, 2010

Lumpiang Shanghai (Pork Spring Rolls)


I chose to share this recipe because I get inspired by my own kids. Children nowadays freely express what they want and obviously I have noticed from my kids that they request from me the food that they want to eat. This Lumpiang Shanghai (pork spring rolls) is one of their favorites to eat since the crunch of each bite excites them and they enjoyed eating it with their favorite dip-catsup. I take the advantage of their food request by putting grated and shredded vegetables so that they will get a healthy meal.

Ingredients:
1/2 kl. ground pork
1/2 medium size grated carrot
1/2 medium size grated turnip (singkamas)
1 tbsp. thinly chopped spring onions
100 g. shredded cabbage
1 tsp. refined salt
1/2 tsp. ground pepper
spring roll wrapper
1 cup cooking oil (dip frying)

Procedure:
  1. Put the ground pork in strainer and wash in running water. Drain well.
  2. Mix the ground pork with the grated carrots,turnips,spring onions, cabbage, refined salt and ground pepper.
  3. Wrap the mixture in desired amount and size.
  4. In a deep pan, heat the cooking oil.
  5. Fry the spring rolls.
  6. Serve with catsup or sweet chilli sauce.
Serves 4-6 pax.
Tips:
  • If you have dry left over vegetables, you can cut them into pieces and include them in your mixture.
  • Make sure to remove excess cooking oil from your spring rolls by putting them in paper towels before serving.


Tuesday, April 6, 2010

Chicken Fried Adobo


Adobo is one of the viands that Filipinos love most. I have tasted adobos from different small and big restaurants and I have noticed that somehow they have the same taste (with soy sauce), same color (brown), and with laurel leaf!

So now, I want to share an Adobo recipe that I have learned from my mother. It is so easy to prepare but has a better taste than the "common" adobo that I usually taste and eat at small and big restaurants. It has a very appetizing smell and distinct taste that you and your family would love to eat more. This recipe is best served with steamed rice.

Ingredients:
1 kg. dressed Chicken cut in desired size
1 head garlic
1/2 tsp. ground pepper
2 tsp. refined salt
1/2 cup vinegar
1/4 cup water
2 tbsp. cooking oil

Procedure:

1. Clean chicken in water. Set aside.
2. Pound and crush garlic.
3. In a pot combine garlic, salt and ground pepper. Combine well (Better to smash all the ingredients with bear hands to extract garlic flavor).
4. Pour in water and vinegar. Stir.
5. Put the chicken and bring to boil for 5 minutes.
6. In a pan, heat cooking oil, fry the chicken until it is golden. Then, bring it back to the pot.
7. After frying all the chicken, fry the crushed garlic until it is golden. Then, bring it back to the pot.
8. For the second time, boil the chicken fried adobo for 3 minutes (This will blend well with the vinegar).

Serves 4-5 pax.

Tips:
  • Taste the mixture before putting to a boil. If not satisfied with the mixture, you can customize by adding more refined salt or ground pepper, water and vinegar to suit your taste.
  • Best served 5 hours after cooking.